Tuesday, August 27, 2019

MobX without decorators and eject

Previous example was about using MobX with decorators. Although decorators makes the code more readable, it introduces transpilation complications. For ease of programming, it will be easier, if we can set aside MobX for React. From version 4.0 of MobX, we don't need decorations. Here's how to get to it

  1. npx create-react-app mobxwithoutdecoration
  2. cd mobxwithoutdecoration
  3. npm i mobx mobx-react
  4. mkdir -p src/components/stores/contactstore
  5. touch src/components/stores/contactstore/index.js

Open contactstore/index.js and add the following contents

import { observable, action, computed, decorate } from "mobx";
class ContactStore {
  contacts = [];
  addContact = contact => {
    console.log("A new contact is added");
    console.log(contact);
    this.contacts.push(contact);
  };
  get contactsCount() {
    return this.contacts.length;
  }
}
decorate(ContactStore, {
  contacts: observable,
  addContact: action,
  contactsCount: computed
});
export default new ContactStore();


As you can see from the above code, we no longer have @observable or @action etc.

Your component to consume provider can be achieved in the following way
import React from 'react';
import { inject, observer } from "mobx-react";
class App extends React.Component {
  render() {
    return (
      ....
      ....
    )
  }
}
export default inject("contactStore")(observer(App));

As you can see we no longer have @observer or @inject. They have rather been converted to HOC components internally.

index.js continues to be the same as it was before. For full code check out here
React with MobX

MobX is a simple, scalable and battle tested state management solution. You can read more on getting started with MobX here
MobX integration with React has been a subject to some difficulty off late, especially after React 16.X update. After a lot of hunt and read, thought would put together a simple sample to make things easier. This integration gets even more trickier if we do decoration approach.

Let's start from a new app
  1. npx create-react-app simplemobx
  2. npm run eject, confirm eject process
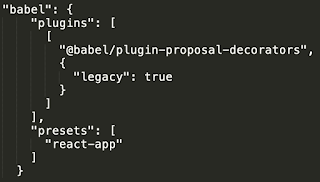
  3. npm i --dev @babel/plugin-proposal-decorators
  4. npm i mobx mobx-react
  5. set babel configuration in package.json to reflect the following


This is all the setup we need. Now, we start to build the store and consuming it
Create a new directory under simplemobx/src/components/stores
Add a new file to say simplemobx/src/components/stores/userstore.js
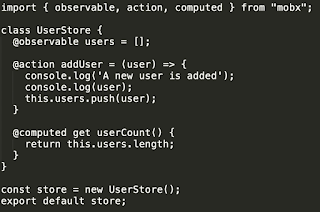
Copy the following contents


Store is now ready and should be hooked up to our app. We start with by adding Provider.
Open index.js
import needed files and setup provider. This is a critical piece for rest of the solution to work. Unless you have a provider MobX cannot inject data objects into our application

import { Provider } from "mobx-react";
import userStore from "./components/stores/userstore";

Next step is to enable Provider for app


Now that provider is available, we build on a consumer. When we say consumer, we can have different operations on it
  1.  Simply consumes data
  2.  Consumes and modifies data
For both cases, MobX injects data store objects in "props". We are then free to use it the way we use it, always. We don't need the complexity of "mapStateToProps" and "mapPropsToSate", "dispatch" and crazy wirings we do with "redux". This simplicity combined with scalability is what has made MobX to be a top state management choice for "react".


Consuming data
As you can see from the code above, we start start by importing needed packages

And then comes the famous decorators. All the magic (eject and babel changes)we did in the setup process was to help us move on with decorator style programming. Decorators allow for a lot of work done with single liner's. It helps in code brevity and helps to focus on application logic.

When we created our store model object, we created it with @observable and here, we use @observer. Meaning is straight forward to follow and nothing more needed. No fancy recursions, polling of any kind is needed
We also had @compute in the store. Anything that does not modify the store and does some sort of computation uses @compute keyword
Finally, when we head on to bigger applications, we'll have multiple stores. To ensure, we associate our component with right object @inject is used

Modify data
Let's build a simple form to add contents to our store object. We create a a simple form, on submission we push data into our datastore. Detailed code can be found in github.


We follow the same pattern as above. Import necessary modules into component, add @inject and @observe decorations. Once we have our data store object available in props, we can now use it and invoke functions like we do with regular object.

Code for the entire application can be found here

Stay tuned to do more on multi data store and scalability features on MobX

Here are some interesting articles/Videos on this subject
https://www.youtube.com/watch?v=76FRrbY18Bs
https://www.youtube.com/watch?v=pPgOrecfcg4

Monday, August 19, 2019

Thread programming in Python

A simple thread involves doing a task continuously in the background, without any interference on main thread. This could be as simple as to display a running clock or check a DB for updates etc

#!/usr/local/bin/python3

import threading
import datetime
import time

def get_current_time():
    now = datetime.datetime.now()
    return now.strftime("%H:%M:%S")

def print_current_time():
    print(get_current_time())

def print_time_until_interrupt(interval):
    while(True):
        print_current_time()
        time.sleep(1)


if __name__ == "__main__":
    t = threading.Thread(target=print_time_until_interrupt, args=(1,))
    # print(get_current_time())
    t.start();
    t.join();

Change first line #! python path to your local settings, before you execute your code. You see code is both light weight and very easy to follow.

If you'd like to have a class based thread operations it's pretty much the same

import threading
from threading import Thread
import datetime
import time

class MyTimer(Thread):
    def __init__(self, interval):
        Thread.__init__(self)
        self.interval = interval
        
        
    def get_current_time(self):
        now = datetime.datetime.now()
        return now.strftime("%H:%M:%S")

    
    def print_current_time(self):
        print(self.get_current_time())

    
    def run(self):
        while(True):
            self.print_current_time()
            time.sleep(self.interval)


if __name__ == "__main__":
    t = MyTimer(1)
    t.start()
    t.join()

We have a couple of situations to work on threads

  1. Producer consumer
  2. Share data/update between threads
Lets start by looking at Producer consumer scenario. In this case, producer would create an event and consumer will wait until the event is set. If and when set, consumer does his job and clears the evnt and pass the buck back to producer for his process. This continues forever.


#! /usr/local/bin/python3
import time
from threading import Thread, Event
import random


class Consumer(Thread):
    def __init__(self, items, event):
        Thread.__init__(self)
        self.items = items
        self.event = event
    
    def run(self):
        while True:
            time.sleep(2)
            self.event.wait()
            item = self.items.pop()
            print('Consumer notify {0} popped from list by {1}'.format(item, self.name))


class Producer(Thread):
    def __init__(self, items, event):
        Thread.__init__(self)
        self.items = items
        self.event = event

    
    def run(self):
        for i in range(100):
            time.sleep(2)
            item = random.randint(0, 256)
            self.items.append(item)
            print('Producer notify. Added {0} to items in {1}'.format(item, self.name))
            self.event.set()
            print('Producer notify. Event set.')
            self.event.clear()
            print('Producer notify. Event cleared.')

if __name__ == '__main__':
    items = []
    event = Event()
    t1 = Producer(items, event)
    t2 = Consumer(items, event)
    t1.start()
    t2.start()
    t1.join()
    t2.join()


Sharing data between threads can be done in a variety of ways. Easiest is to use Queue. Create a simple Queue (python) data structure and exchange data between them.


#! /usr/local/bin/python3

import time
import random
from threading import Thread, Event
from queue import Queue

class Producer(Thread):
    def __init__(self, queue):
        Thread.__init__(self)
        self.queue = queue

    def run(self):
        for i in range(256):
            item = random.randint(0, 256)
            self.queue.put(item)
            print('Producer {0} - Item {1} added'.format(self.name, item))
            time.sleep(2)

class Consumer(Thread):
    def __init__(self, queue):
        Thread.__init__(self)
        self.queue = queue

    def run(self):
        while(True):
            item = self.queue.get()
            print('Consumer {0} - Popped {1} item from queue'.format(self.name, item))
            self.queue.task_done()

if __name__ == "__main__":
    queue = Queue()
    t1 = Producer(queue)
    t2 = Consumer(queue)
    t3 = Consumer(queue)
    t1.start()
    t2.start()
    t3.start()
    t1.join()
    t2.join()
    t3.join()


Next up Process programming, coming soon....